
In May 1941, as the war raged in Europe, a single-engine fighter of more than 4t made its first flight. This fighter was the XP-47B, prototype of the Republic P-47 Thunderbolt of which a total of 15683 units will be built. Thanks to war experience, this aircraft was equipped with a 2000hp radial R-2800 engine, a supercharger and eight 12,7mm machine-guns. The XP-47B was to reach 633km/h and in January 1942, just after the USA went to war, the production of P-47B began. It was followed by the P-47C that incorporated various improvements and, from April 1943, by the P-47D, the most built version. The P-47D was equipped with an R-2800-59 engine, which can develop up to 2300hp with combat emergency water injection system engaged. The ducts that were passing on the sides and below the cockpit to connect the supercharger placed behind the pilot's seat gave to this plane its massive aspect. Many sub-types of the P-47D, designated D-1 to D-40, were produced but the first versions were called "Razorback" because of their sharp edge dorsal fin. The D-25 sub-type, which was introduced around June 1944, was fitted with an electrically actuated bubble canopy in order to improve pilot visibility and increased capacity fuel tanks. This decision resulted in a completely remodeled plane shape. All subsequent sub-types were also fitted with the bubble canopy and became a characteristic feature of late production Thunderbolts. The P-47 "Bubbletop" proved to be an excellent, well-balanced fighter-bomber.
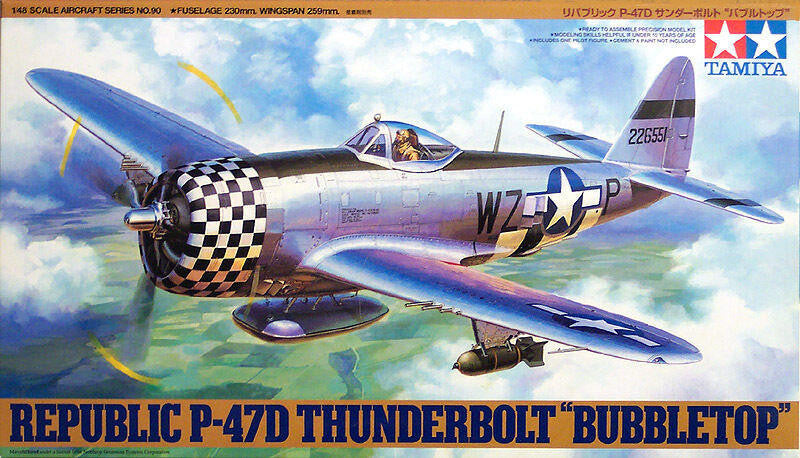
Republic P-47D Thunderbolt "Bubbletop" plastic assembly kit. 1/48 scale, Overall length: 230mm, Overall width: 259mm. This is the representation of P-47D late production that was nicknamed "Bubbletop". The massive form of the plane, especially its belly and its cowling, has been accurately reproduced. Flaps come as separate parts and can be attached in the up or down position. Parts for replication of 3 types of mirrors, gun sights and 4 types of propellers are provided. Engine cowling flaps and the intercooler air outlets on each side of the fuselage can be represented in the opened or closed position. Parts for replication of 500-pound bombs, rocket launchers and 3 types of drop tanks are part of the kit. A pilot figure and decals for two different markings are included.
Skip to product information
The story behind your model New guide preview
P-47D: the bubble-canopy Thunderbolt
The bubbletop Thunderbolt shows how combat experience changed an already formidable fighter. Earlier P-47s had a raised spine behind a framed canopy, which restricted the pilot’s view to the rear. Later P-47Ds cut down that spine and introduced a clear bubble canopy. This was a change within the D-series itself, so both razorback and bubbletop aircraft can correctly carry the P-47D name.
Read the full story
The new canopy sat above the same basic heavyweight concept: a powerful Pratt & Whitney R-2800 radial engine, eight .50-calibre machine guns and a turbo-supercharger system buried inside the airframe. Ducting between the engine and the rear-mounted turbocharger helped give the Thunderbolt its deep fuselage. Its rugged structure made the aircraft valuable both on high-altitude escort missions and in the dangerous low-level fighter-bomber role.
Tamiya’s two marking choices place this late-war shape in England during 1944. Benjamin Mayo’s Duxford aircraft combines a metal finish with a checkerboard cowling and underside invasion stripes. William Kepner’s Mount Farm aircraft offers a contrasting command-aircraft finish. These are different individual machines, including different anti-glare treatments and equipment choices: selecting one complete option gives the build a clear historical identity.
Sources and accuracy
Tamiya 61090 instructions; USAF Museum: P-47 variants; Smithsonian: Thunderbolt design
Kit Instruction Colors
View kit instructions (PDF)
![]() Find a Similar Color
![]() Find a Similar Color
![]() Find a Similar Color
![]() Find a Similar Color
![]() Find a Similar Color
![]() Find a Similar Color
![]() Find a Similar Color
![]() Find a Similar Color
![]() Find a Similar Color
![]() Find a Similar Color
![]() Find a Similar Color
![]() Find a Similar Color
![]() Find a Similar Color
![]() Find a Similar Color
![]() Find a Similar Color
![]() Find a Similar Color
![]() Find a Similar Color
![]() Find a Similar Color
![]() Find a Similar Color
![]() Find a Similar Color
![]() Find a Similar Color
![]() Find a Similar Color
![]() Find a Similar Color
![]() Find a Similar Color
![]() Find a Similar Color
These are the kit manufacturer’s paint recommendations. Follow the exact instruction diagrams for placement, marking choices and mixes. They are separate from the historical palettes below.
Build This Aircraft
These 25 paints are listed on page 2 of the P-47D Bubbletop assembly manual. AS-6 Olive Drab and AS-7 Neutral Gray are the main aircraft colors; XF-62 is the acrylic alternative to AS-6, and TS-29 the spray alternative to X-18. The two alternatives start unchecked. Choose marking A or B and follow the manual for placement and detail colors.
Paints (25)
0 items selected
Tools and supplies (8)
Select any tools you need to add them with your paint selection.
Checking supply availability…
Paints and supplies sold separately. Prices and availability update from each product.
Historical Paint Schemes
Choose a documented aircraft or vehicle finish, then a paint system. These researched alternatives are separate from the instruction list above.
Each pack is its own shopping list. Choose one paint system; selections stay separate. Out-of-stock items remain visible but cannot be added. There is no bundle discount.
Exterior scheme colors only. Check the diagrams for pattern and placement. Interior, crew, small details and decals are not included unless a pack explicitly says so. Model paints are manufacturer-intended reproductions or labeled approximations, not independently measured exact historical matches.
Sources and accuracy
Tools for this build
Practical suggestions for assembling and finishing this kit. Buy only what you need; nothing here is added automatically.
Build basics
Loading current prices and availability…
Useful extras · optional
Loading current prices and availability…
Choose glue for the material and thinner for the paint range. A shared base type alone does not guarantee different brands can be mixed together.





1/48 P-47D Bubbletop Thunderbolt 61090
Regular price
$56.99