
Trumpeter TBD-1 Devastator, Kit No. 02226, 1/32nd Scale
Posted by Phillip Friddell on 11th Aug 2023
It’s been a long time coming, this one; twenty years, to be exact, from the date of its initial announcement until we finally received the kit some several weeks ago. Two decades is an exceptional gestation period for almost anything these days and it’s remarkable in the extreme for a polystyrene model airplane kit. That simple fact begs the question: Was the wait worth it? The answer to that one is Yes, although with a caveat or two.
The real airplane was a miracle of technology when it first went into service with the Fleet in the late 1930s. It was an all-metal monoplane at the end of an age when canvas-covered biplanes still armed the bulk of the world’s navies. It was capable too, or at least it was when operated alongside other types of air assets in what is nowadays known as a combined arms operation, but time quickly passed it by and it had become a marginal platform by 1940. It was on the carriers when war came to the United States on December 7th, 1941, however, and was employed with a degree of success during the early 1942 reprisal raids. It was marginally effective at the Battle of the Coral Sea as well, primarily because those early battles allowed the airplane to be used according to doctrine, an absolute necessity for its survival in a combat environment, but poor timing and marginal tactics during the Battle of Midway finally rang down the curtain on combat use of the TBD. Just a handful of Devastators survived that battle and it was promptly relegated to a second-line aircraft, with the remaining airframes briefly transferring to training operations before being retired and stricken. Still, that brief combat history and its apocalyptic performance at The Battle of Midway secured the TBD’s place in history and as a result it’s always been at the top of the want list for scale modelers, although it was a brave manufacturer indeed who saw financial success in tooling up a kit of the thing. 1/72nd and 1/48th scale models of it had been released over the years but they were few and far between, while no mainstream manufacturer had ever produced one in 1/32nd scale. That made Trumpeter’s announcement of a pending kit all those years ago exciting news indeed but the excitement quickly changed into a standing joke as time rolled by year after year with no TBD in sight. Good things come to those who wait, or so we’re told, and the kit finally arrived a few weeks ago when the earth moved, modelers rejoiced, and otherwise well-grounded hobby shop personalities were seen to skip down the halls of their establishments holding the kit and grinning! The model looked pretty good in the box too, and the word was out that Trumpeter’s vaunted A-Team had done the tooling for this one, which seemed at first glance to be the truth. That somewhat obviously took us to the question: Was the wait worth it? We think it was, but with a few caveats.
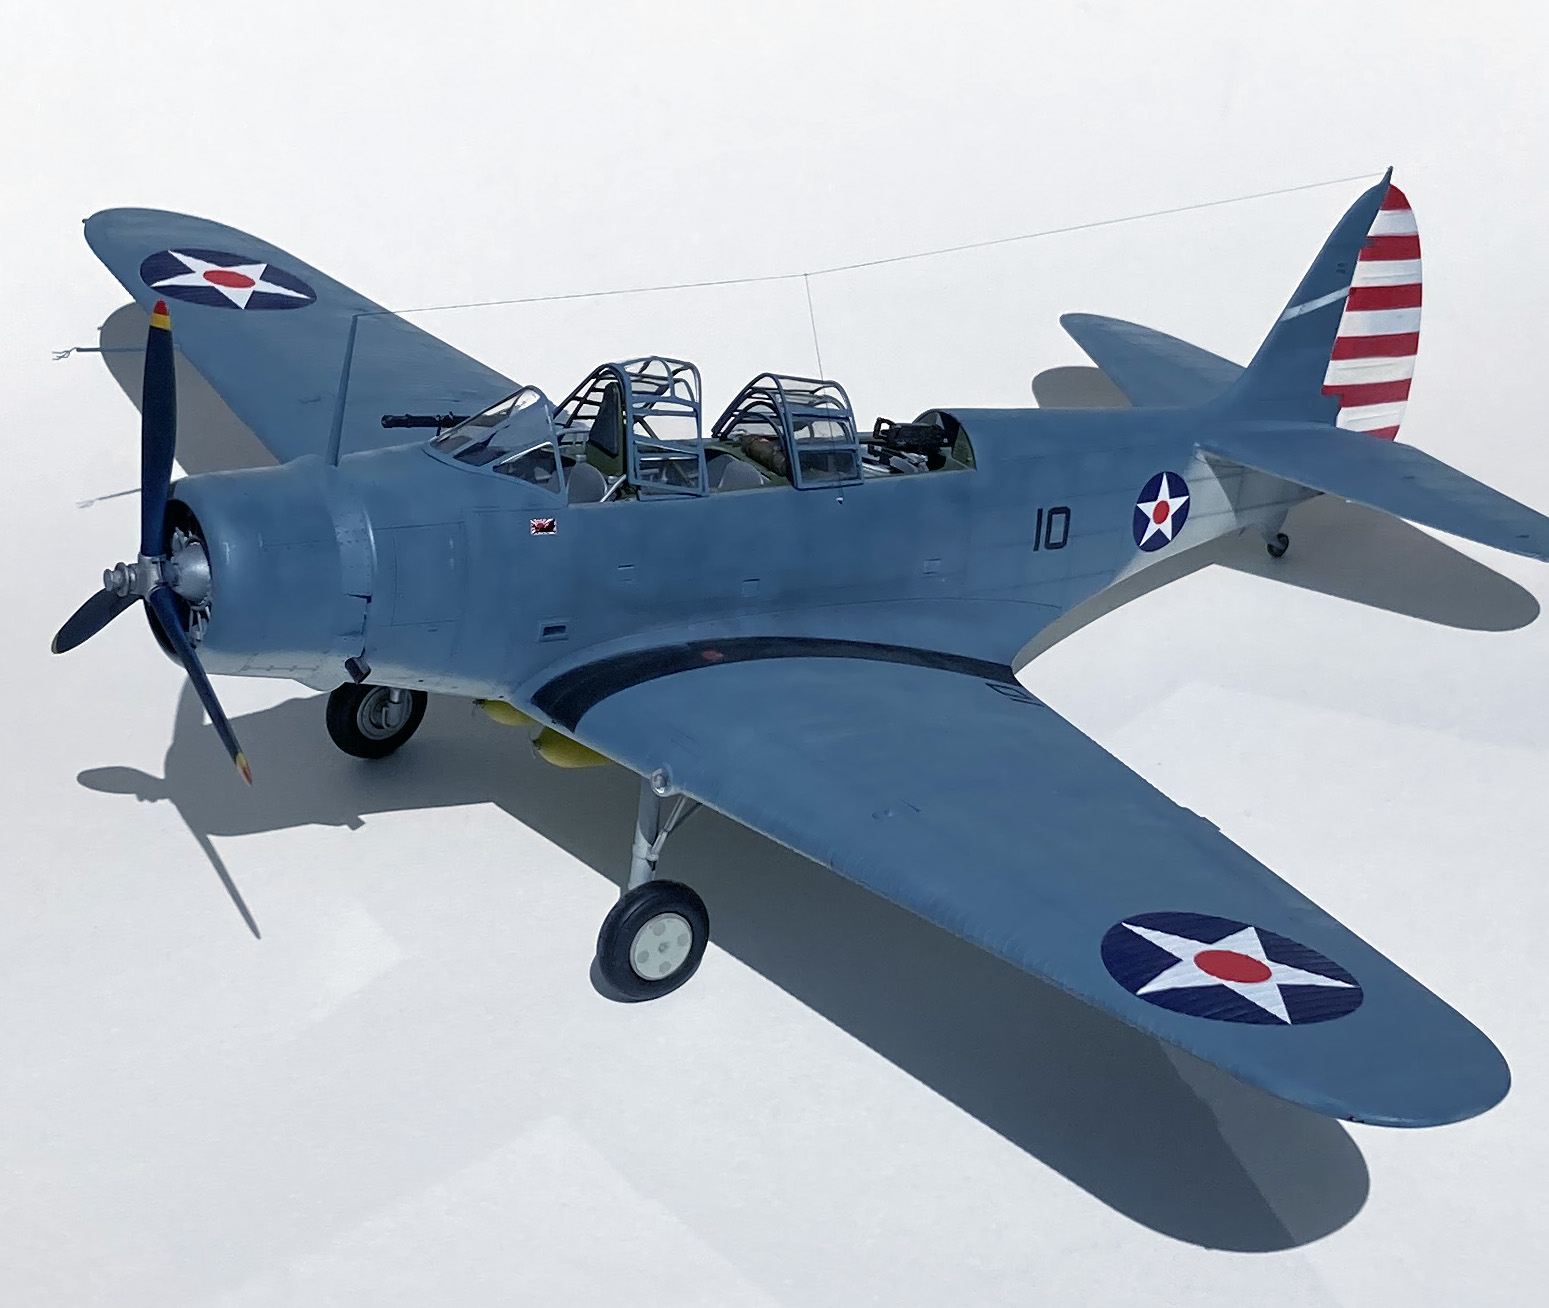
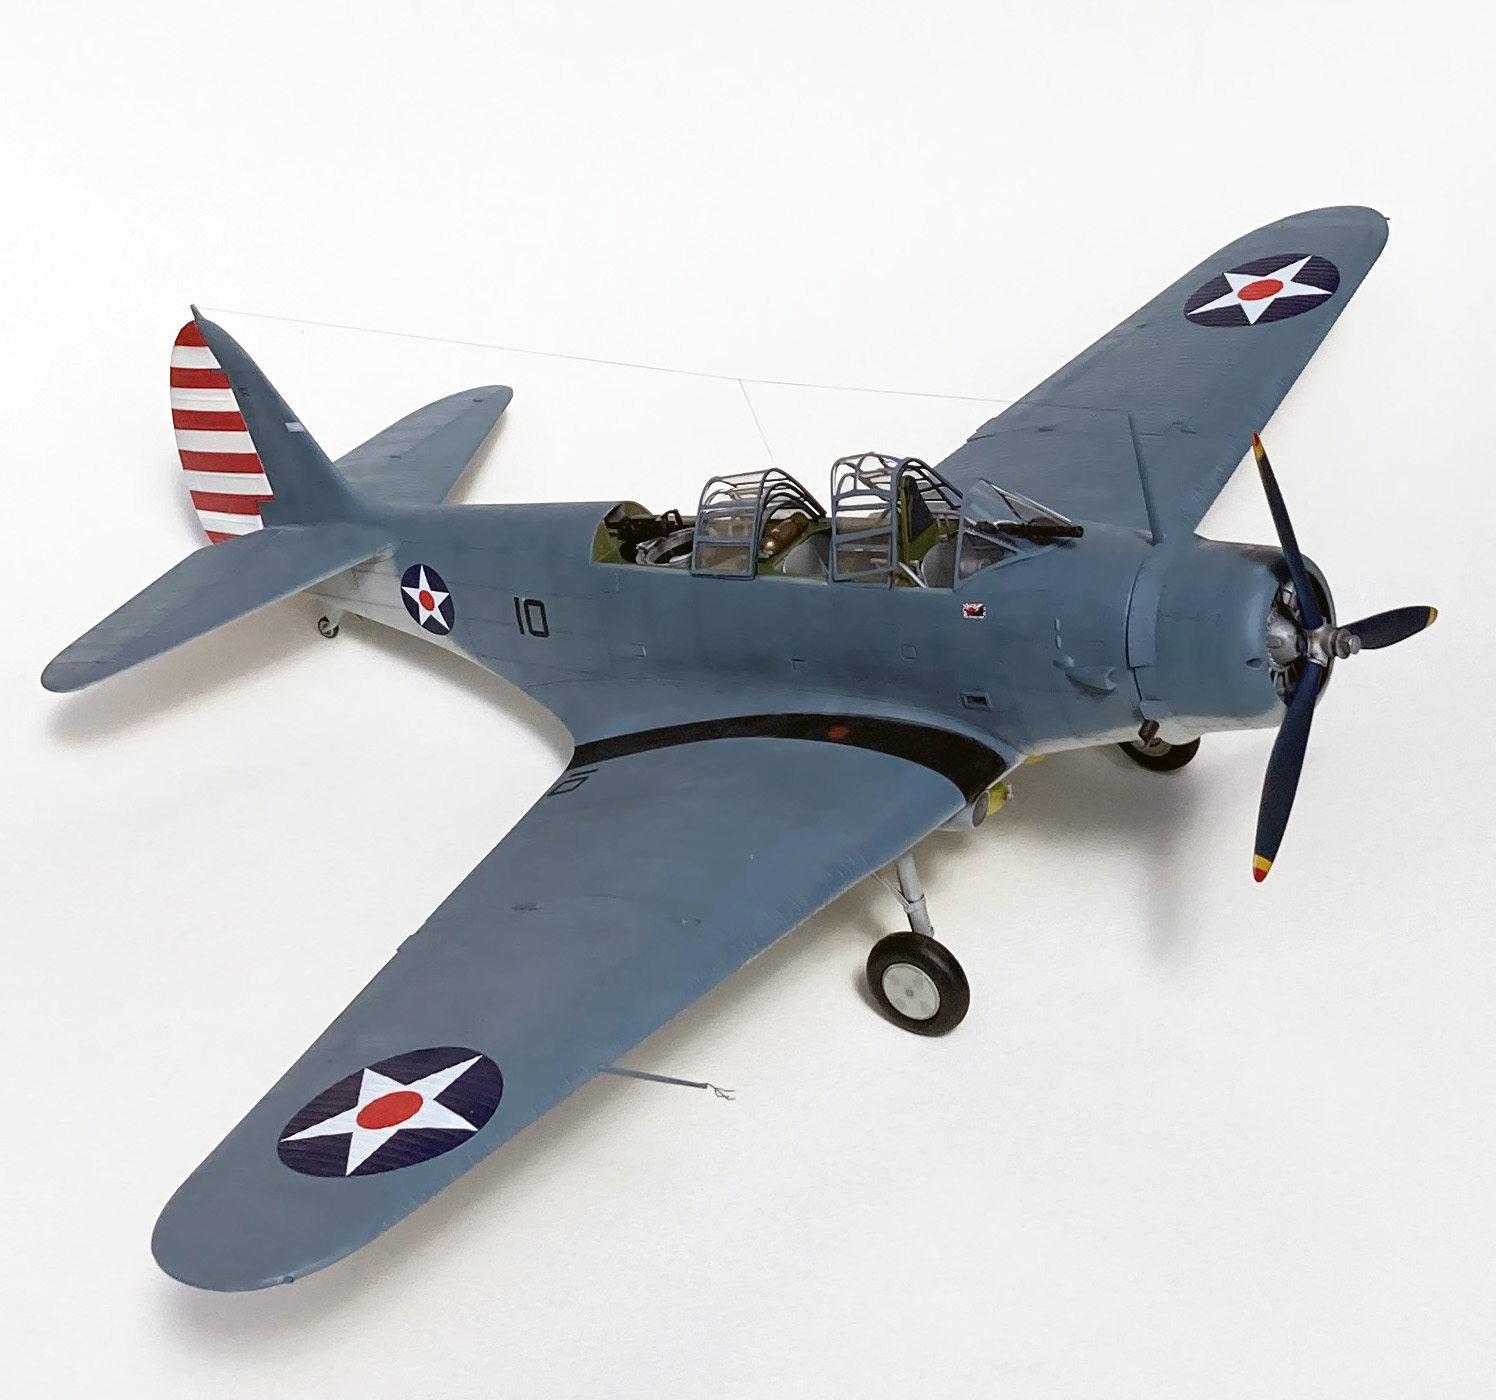
And here it is; the long-awaited Trumpeter TBD-1 in 1/32nd scale! We wanted to do a model of the airplane when it was in its wartime prime and chose to do Lance Massey’s VT-6 bird off the Enterprise at the time of the early-War reprisal raids. Massey managed to torpedo and possibly sink a Japanese ship early on, resulting in the “kill” marking under the windscreen. (His airplane was just as often armed with bombs during this period, which is how we’ve chosen to configure our model.) Massey, like so many others in the TBD community, died in action at Midway, which makes the model a somewhat maudlin tribute of sorts.
So what’s in the box, you may rightly ask? For starters, there’s a fair amount of beautifully-molded plastic including two cowlings, one with open cowl flaps which was the airplane’s normal on-the-ground configuration and one with closed flaps; two canopy sets, both opened and closed; a fret of brass photo-etch, and two neoprene tires. The big pieces, the ones you can see on the outside of the model, are well done and there’s not a whole lot to complain about in that regard. It looks like a TBD and everything fits really well. This model is designed to be built, not collected! That’s the Good News, but there’s Less Than Stellar news to consider as well because the kit was apparently tooled by committee, leading to a model that contradicts itself in many ways. That said, it’s important to know that an attractive model can be produced using only what comes in the kit’s rather sturdy box, and it’s a path that can be followed should you choose to do it. We decided to fix a few things in our example, however, so that’s what we’re going to concentrate on today.
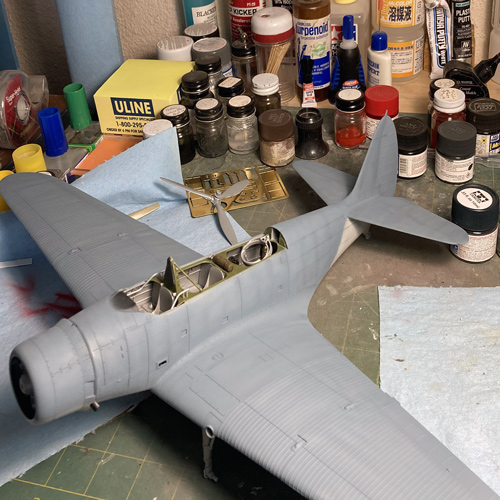
Here we are, partially built. Those boarding steps haven’t been corrected and the interior bears similarity to the empty athletic arena of your choice, but the kit has good bones and there’s a lot of potential to be found here. It’s a big model and the Devil is most assuredly in the details!
Let’s start with the interior. The real airplane had a LOT of plexiglass so almost everything inside the cockpit could be seen from outside. The kit provides the big pieces that go in there but very few of the detail components, and a portion of what is given is inaccurate to boot. Things aren’t helped any by the fact that the cockpit of the real airplane was somewhat of a double-decker, with a crawlway beneath the “floor” that allowed the Assistant Pilot, who also functioned as a bombardier when appropriate, to move to the nose of the airplane below the pilot’s position in order to use the bombsight living down there. That means there should be detail both in the cockpit and below it, and there’s nothing underneath that kit cockpit except for the bottom of the kit’s flooring. Of course, those bombardier’s doors in the lower nose were rarely opened when on the ground unless that portion of the airplane was being maintained and were only opened in flight during an actual bombing run, so we can side-step that issue by carefully fitting and closing the doors. That’s one down…
Then there’s what we would nowadays call the weapons bay. The kit provides a torpedo and a couple of marginally accurate bombs, but employment of either a torpedo or a 1,000 lb bomb requires the aft portion of that bay to be opened up and detailed because it’s just an open hole as given.Trumpeter have also totally misunderstood the way the bombs were mounted and omitted the various fairings sometimes, but fortunately not always, fitted when the aircraft was so armed. They also omitted the wing racks, which only carried 100-pounders but were used in combat during those early raids. References are your friend in this regard, or you can always model with airplane sans ordnance. The choice is yours!
Then there’s the bombing window that lives up in the nose. Its fitment is confusing at first glance but the component has small tabs on its sides that correspond to landings in the interior structure. Align everything properly and there will be no confusion at all. Stick it in there by guess and by golly and frustration may well come to visit you. This kit is, and we can’t stress the fact enough, an easy builder but you have to pay attention to what you’re doing! It’s Modeling 101, right?
There’s a bit of that interior to be seen here, but not much. It’s by far the worst aspect of an otherwise good kit and really lets things down—there’s enough going on in that cockpit to make the interior the star of the show and very little of it is provided by Trumpeter. Let’s call it Opportunity: The aftermarket guys are going to love this kit!
For the most part the basic airframe is just fine, although when examining the exterior of the fuselage we find a series of rectangular indentations, three per side, which correspond to the real airplane’s boarding steps. In real life those steps appear as little flush mounted rectangular panels and are spring-loaded from behind, to be kicked in when boarding the airplane. The folks at Trumpeter totally missed the boat on that one but there’s an easy fix for the problem: Evergreen includes .020 by .100 styrene flat bar in their somewhat amazing range of structural shapes and it’s the perfect thickness and width to use for those step covers. Simply cut to length, clean up, glue into place, and move on. It’s an easy fix, and a necessary one. Canopy rails were prominent on this airplane and are totally ignored by Trumpeter, but Evergreen can provide the shapes to reproduce those too and it’s an easy fix, although we didn’t do it to our model.
Then there’s the engine, which is adequate as a placeholder but should really be replaced with something a bit more accurate. Most of the kit’s powerplant is hidden by the cowling, fortunately, and it’s doubtful most people will even notice the problem, but the problem is there. As an aside, the kit’s cowling is locked into place by a small tab at its bottom that plugs into a rectangular hole in the front of the fuselage after which the assembly is locked into place by the radio mast. At first glance this is a poor way to do things but to Trumpeter’s credit that apparently unworkable installation method works out to be just fine in actual practice. One other thing while we’re talking about that cowling: There’s a gun port on the starboard side of the cowling front for the .30 caliber fixed gun that comprised the airplane’s forward armament, but there’s no corresponding blast tube inside the cowl. It’s almost invisible, truth be known, but it should be there and would be easy enough to add from plastic tubing (just be sure it clears the engine cylinder heads should you choose to do that). For what it’s worth…
A large circular oil cooler lives underneath the starboard wing near the fuselage and it looks pretty good from the outside, but as given it’s nothing more than a tube with a photo-etched grill inside it. Most people will never notice it but those who understand the airplane will. It’s worthy of correction.
The landing light comes across as over-simplified and needing replacement but it works very well after installation. It’s a simple, one-piece component and some design engineer obviously gave it a lot of thought and it can be used as-is.
The tires are neoprene, or rubber, or something soft and tire-colored, and we don’t like them one bit. Call it a personal preference or just being overly picky, but we’d love to see them replaced by resin and, while we’re down there, the wheel wells could stand a bit of work as well. This is a big airplane and detail really helps put it over the top. Lack of detail in any area doesn’t help the overall cause one bit!
The wings can be built either folded or extended. We chose the latter for our model and had no issues with it while following the kit’s construction method; we hadn’t mentioned it previously but this kit is very well designed and everything fits almost perfectly with the exception of those bomb aiming doors, which were rather obviously meant to be installed in the open position. Should you choose to model them closed you’ll need to trim a bit of length off the hinge “fingers” and do some fitting to get them flush with the rest of the fuselage. It’s no big deal, but you’ll have to do it.
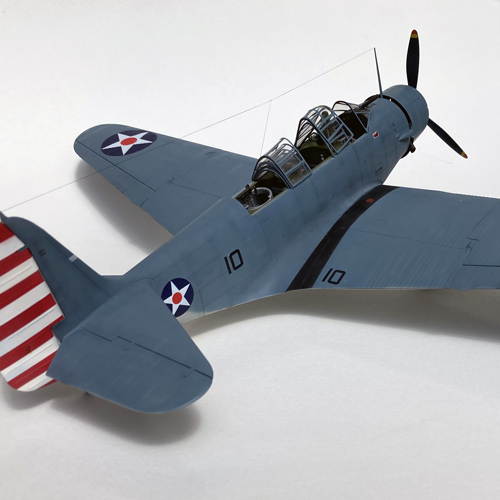
Here’s another view of the completed model. Lack of detail on the propeller hub shows up here and needs to be fixed, providing yet another opportunity for the aftermarket crowd. It looks ok, mind you, but it isn’t quite right. Still, it sure looks like a TBD, doesn’t it? There’s enough there to get you where you need to be and the completed model presents well on the shelf, which makes the sparse cockpit detail all the more irritating!
Those complicated transparencies provide yet another opportunity for problems but in truth they’re little short of excellent, if somewhat thick, although the windscreen framing may be partially inaccurate as given. The plastic is a bit thick if you’re going to depict them opened up as we did, but it can be done with a bit of care and forethought. There’s also a one-piece part representing the canopy in its closed configuration if you don’t want to open things up. We would prefer thinner opened parts but what comes with the kit is entirely workable and a sheet of canopy masks are provided as well. Those masks are lightly textured and look odd on their backing sheets but don’t be put off by them because they work great in practice, and are easily as good as any aftermarket masking sheets we’ve used.
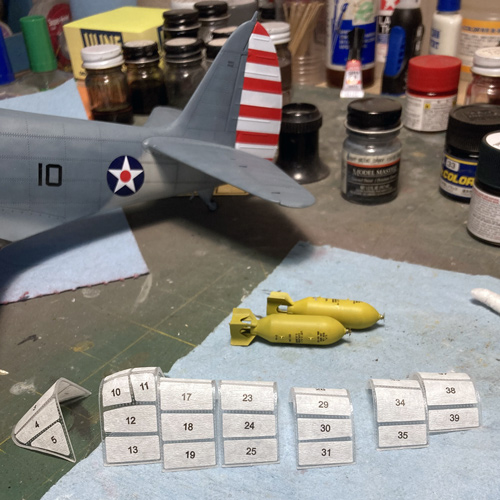
The transparency masks after application to the open canopy stack components. Two complete sets of them are provided with the kit and a clever modeler could take advantage of that to mask both the inner and outer surfaces of the transparencies if they so desired by simply swapping the ones destined for the interior left for right, a nice if perhaps unintended bonus! Those bombs are intended for our reprisal raid Devastator and are Eduard Brassin’ items rather than the somewhat odd ordnance supplied by Trumpeter. (While we’re on that subject, Navy bombs of the time period could be found painted either olive drab, light gray, or yellow. Don’t be put off by their color; look for fuses, which connote live ordnance.)
A single free .30 caliber Browning gun is provided for use by the Radio Operator/Gunner. It would be nice to have one a bit better detailed and most, but not all, of the airplanes expended at Midway used a twin mount similar to that found on the SBD-3 (they may have actually been modified SBD mounts), but the kit gun is usable for any pre-War airplane or on those used for the reprisal raids or Coral Sea. Note that the gun’s normal position was down in its well stowed away unless deployed for gunnery training or combat, and on the actual airplane the doors for it were spring loaded so they would never be shown deployed unless a gun barrel was between them holding them open. If the gun is stowed, the doors are closed. If the gun is deployed, those doors are closed. It’s an easy detail to duplicate since Trumpeter provides both as an option; put the open doors in the spares bin, use the closed doors for either configuration, and you’re good to go!
The collimator (often called a telescopic gunsight which it sort of is but not really) is well detailed and easy to install. Follow the directions though, because it won’t easily fit through the mounting holes in the windscreen if you completely assemble it first.
The kit provides a fret of photo-etched brass as previously mentioned, marked with a 2020 copyright date. It doesn’t look that impressive at first glance but first impressions can be deceiving because in practice everything provided there works just fine, including the lap belts (no shoulder harnesses on this airplane, folks!). One item that benefits from it is the pitot head, which on the TBD is a peculiar trident-shaped item that in theory should be difficult to model. The kit deals with the component by providing an etched brass head that attaches to a plastic pitot tube. It takes a bit of care to install but looks great once completed and adds quite a bit to the finished model’s appearance.
One further thing to keep in mind when working with this kit: The TBD was built in limited numbers and there were no official variants of the airplane; it was a TBD-1, period. That said, details were changed as the airplane went through its life cycle and overhaul periods, so care needs to be taken in order to build an accurate model. It’s best to have photography available to consult while building this one.
What, then, is the verdict on this long-awaited kit? The answer is simple: It’s pretty darned good in spite of itself. We can build it straight from the box and get a fine, if somewhat under-detailed, model for our efforts, or we can correct a few things and get a replica that’s outstanding. The interior, or at least the lack of proper detailing in that area, is a huge negative that can be offset by a bit of scratch-building. It can also be dealt with by the simple passage of time since at least one aftermarket manufacturer has already announced an enhancement kit for the cockpit and others will surely follow suit. In our world the indifferent ordnance supplied is a case of no harm/no foul since we normally turn to the aftermarket for that sort of thing anyway. The tires are a major disappointment but they’re also a Trumpeter trademark and with any luck someone will offer resin replacements for them in the near future.
This is, in spite of the complaints, a good model airplane. Yes; Trumpeter could have and should have provided more detail, particularly inside that enormous greenhouse, but so doing may well have priced the kit out of the reach of a great many modelers because tooling costs money! Do your part while building your Devastator, be prepared to incorporate a bit of Modeling 101 into your efforts, and you’ll get a good model. Correct the deficiencies and you can end up with a great one. We like it and in all likelihood will build another once the aftermarket has addressed the more significant of the kit’s failings.
We don’t know anybody at Trumpeter but it’s easy to come to the conclusion that kitting this airplane fought them tooth and nail regardless of the validity of the internet claim that they essentially cloned the Great Wall kit in a larger scale. It’s to their credit as a company that they stayed with the project at all given its research difficulties (research has never been a Trumpeter strength) and, like it or not, the TBD was an important type in the history of the Pacific War that needed to be kitted in this scale. We like the kit and can deal with its shortcomings. What’s good is actually pretty exceptional, and what’s bad can be dealt with. In theory we're modelers, not kit assemblers, right? RIGHT!